Like this? Follow me:
Imagine my delight,
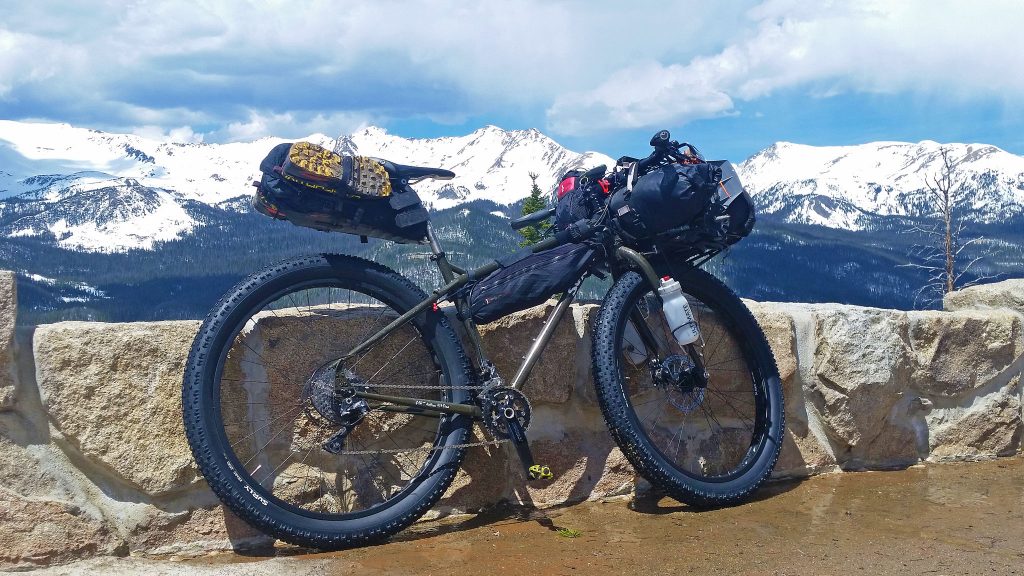
when an enormous box from Surly was delivered to my door, with instructions to do something cool with the contents: A medium Surly ECR, and a 24-Pack Rack! I was planning a trip to Breckenridge to say hello to my Brother who was becoming a year older, and I wanted to climb some mountains to train for the Tour of the Highest Hundred, so naturally, The Surly ECR entered into the thick of my plans.
In this post, I’ll go over the unboxing process, some of initial thoughts, and how I’ve set things up for a 5 day bike tour + mountaineering (bike-a-neering?) trip to Summit County. In a follow up post, we’ll talk about that trip itself.
Unboxing and setting up the bike was pretty straightforward. I’ve never in my life seen a bike so protected: every piece of the exterior of the frame or the components – save for the wheels themselves where covered in two layers of packaging material/tape. I managed to tear the rear derailer’s cable housing while being a bit too over exuberant in the assembly process. This wasn’t a problem, except one long piece of housing covers the entire cable up to the shifter! That’s a lot of housing to replace! But ultimately, this is for the best, as it practically guarantees that dirt and other muck won’t enter into the derailer’s housing.
My suggestion though, would be to have a reputable bike shop handle the build up of your own bike to double check everything is built up correctly – things can happen at the factory or during shipping. For example, my back wheel was ever so slightly out of true. The drive side and non drive side spokes were of fairly different tensions… which isn’t a problem or even strange in of itself, but I decided to get it checked out, since wheels are one part of a bike I’m fanatical about getting correct and one scenario weighing heavily on my mind is that the wheel was bent during shipping. Healthy wheels are long lasting wheels. Freshly retensioned and trued, I was ready to go on the wheels dept.
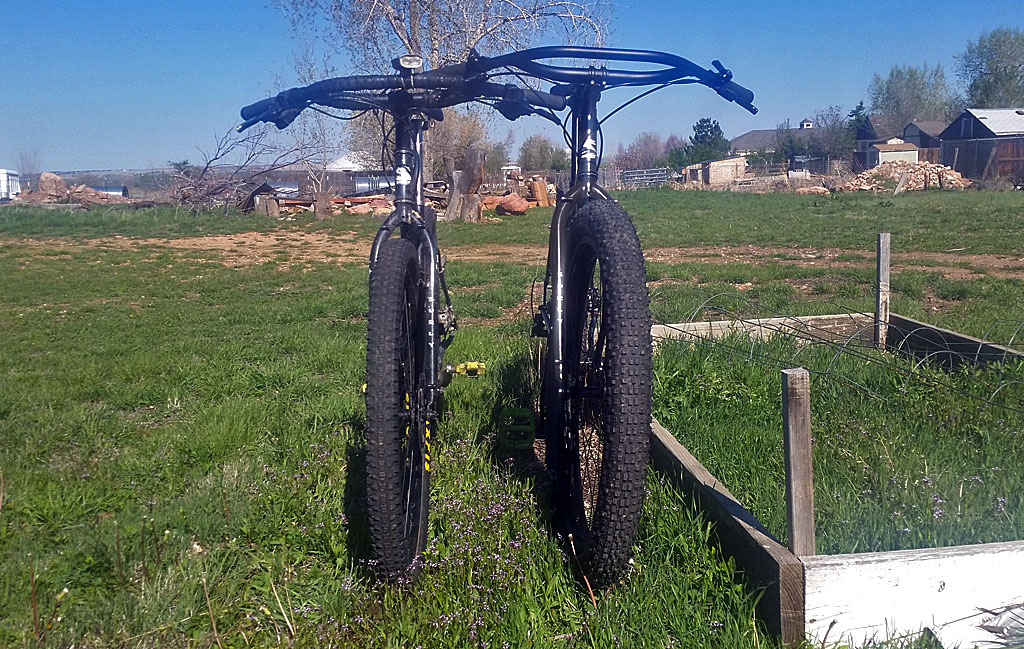
Before long, I had what appeared to be a bike – and what a bike! It’s was as if someone Photoshop’d my Surly Ogre and transformed it to be about 115% of it’s original size. Almost every measurement was larger: 3 inch tires, as opposed to 2.2″, a much longer wheelbase/chainstay length, slacker head tube – you name it.
Some details of the build that stand out:
Frame – Beast Frame! I was trying to think of what to call this bike: Jesse, Kodiak Bear? Moose, the… Moose? Name it after some recently extinct, Ice Age mega-fauna? Or perhaps a smelly best of burden? The wheelbase is long, long, long – the type of geometry that just begs to be loaded down. Luckily, that’s exactly Surly’s intentions. In comparison, it made the Ogre feel absolutely twitchy. The ECR, it seems, is designed to plow through anything, rather than dance around obstacles.
Handlebars – I was actually very relieved that this ECR came with Jeff Jones Loop H-Bars, which I absolutely adore. It’s what’s on my Ogre too, so getting used to the ECR took but a few seconds. Surly has now come out with their own take of the do-everything handlebar – the Moloko. I’m intrigued, but it’ll take a lot to tear me away from my H-Bars. Given the recent Ogre refresh, I would guess that when Surly updates their complete build of the ECR and modifies the frame (Surly sometimes does that!) , they’ll swap the H-Bars for the Moloko’s, widen the 135mm rear hub spacing to their Gnot-Boost O.L.D., and change the fork to the non-suspension-corrected. No idea if, and when they’ll do that, though. Gnot-Boost would be nice just for future-proofing the bike, and c’mon: who’s running a suspension fork on this beast?
Wheels – the meat of the bike. The Rabbit Hole rims, paired with Surly’s own 3″ x 29″+ Knards are what make the ECR the ECR. It cannot be overstated just how massive these wheels are when compared to my Ogre’s 2.2″ tires on a 23mm wide rim. It’s another intriguing design idea, one which I’m still experimenting on just what is the best way to fully utilize it. I pumped these tires up to 20psi for the initial ride out of my back door on pavement, which, looking back, was probably stupid-high pressure.
Anything above 15psi may not make much sense, as the tire will most likely roll slower, even on tarmac. I’m just going to come out and say this though: the wheels are f-ing heavy, and when paired with a frame that’s made to survive an Apocalypse with nothing left except cockroaches, does cause a unshakeable feeling to this bike of being, well, not a speed machine in most situations. In comparison again, the Ogre felt almost delicate! Surly Hub up front; Shimano LX hub in back (135mm) no complaints.
I inquired to a trusted bike mechanic on how doable it was to make these wheels set up tubeless. There’s no way you’d save weight, but no one loves pinch flats, and the urge is to run these tires pretty low. Ghetto tubeless is certainly an option, but that may be the only one with the tire/rim combo. They talked me out of it, but I’d like to explore some options later. I dare say I haven’t bought an extra 29+ tube for this rig; I’ve simply hoped not to pinch flat, and brought along a regular 29er tube. Bad idea? Most likely.
Shifty-Bits – 2 x 10; 11-36 in back, 36/22 in front. Great spread. Of course, I’d like more. I could see someone moving half as fast as someone walking on the same terrain and be perfectly happy with that scenario – who likes pushing a bike? But out of the box, this is great. Unloaded, you could most likely roll over anything. Loaded, well: it depends on how loaded. Remember that the 29″+ wheel size will total a much larger total gear inch measurement than a 29er rim – ie: for each revolution, you’ll travel farther; so think about that when figuring out if the gearing is right for you.
A wonderful surprise were the shifters themselves: 10 speed compatible indexed thumb shifters! With an option to run them in friction mode! My prayers have been answered. There’s no doubt that trigger-style shifters are a bit easier to use, but I cannot tell you how convenient it’s going to be running my rear shifter in friction mode in the middle of the night, when it’s raining on me, my derailer is perhaps slightly bent, I’m over-caffeinated and all I want to do is not feel my chain skip like a mother as I pedal at 5mph up a hill trying to find a good place to camp… perhaps being chased lazily by ne’er-do-wells and needing to catch flight the next day.
Having not used thumbies since, I dunno, I was 16, it’s taken a little time to get used to them again, but I think with a little practice I can get fairly adept at shifting with them again. This is def. one component I’d like to transfer over to my Ogre when the time comes to replace my shifters. “Bombproof” is most def. a theme I like to work with.
24-Pack Rack – never did I really think I’d go back to putting a rack on a mountain bike ever again, so sweet modern bikepacking bags truly are. But you gotta keep an open mind, you know? Installing rear racks doesn’t bring back the nicest of memories for me: they’re usually a pain in the ass to get just right. Someone must have sensed my lack of bicycle wrench talent, and the 24-Pack Rack that came with the ECR was already set up perfectly for the bike itself. I had to tighten down four bolts, and we were good. Sweet relief. Once on, the rack stayed put: no swaying, or bending, or anything: it was practically part of the fork.
The rack itself comes with an assortment of bits and bobs to fit a large spread of forks, but it certainly looks like it’s designed to work hand in glove with Surly’s own offerings. You could say that for really much of the inventive Surly components: the wheels, the cranks, etc. It makes me believe that starting with a complete bike may be the way to go if you’re going Surly these days, rather than thinking you can pick up an inexpensive Surly frame and build it up with items floating around your parts bin.
I did make some modifications before finishing my build by customizing the points of contact with the bike: I traded out the supplied grips with Ergon grips, the supplied seatpost/saddle with a Salsa Titanium Seatpost and Ergon Saddle, and put some Time Atac‘s on as pedals – same as my Ogre. I kept the stem length the same, although my gut feeling was to shorten it 10-20mm to match the reach to be exactly the same as my Ogre but thought I’d try the ride I had in mind a bit more stretched out.
Once built out, I dressed up the bikes with what I had laying around. The ECR/24-Pack Rack is designed to work with what ya got, rather than needing to feel like you need to trim it in custom gear. The 24-Pack Rack could in theory just hold a tent and a sleeping bag, plus a backpack for everything else, and you’re off for a overnighter in your favorite National Forest. No need to over think things: GO! Have fun, get messy, and do it: right now.
On this initial trip, I loaded up the Surly 24-Pack Rack with my sleep system: sleeping bag, pad, liner, tarp, bivvy; most of my mountaineering gear: crampons, ice axe, microspikes, trekking poles, snowshoes; and finally my 25 liter Ultimate Direction Fastpack: which also held my food, some extra clothing, my electronics, my water filter, and a few other things I’d like to have easily available. Quite the load! But those are the sorts of things I do with my bike rides. Now, take all that crap (minus the sleep system) and put that on your back. Since recently, I’ve just worn the pack, and strapped everything else I required on there.
Right away, I could see the massive utility of having this front rack. Wearing a large pack on long bike rides is little if any fun, and being able to offload that onto the bike itself is like feeling freedom for the first time! I’ve unloaded all this gear off my back before, but this is how I’ve done it,
That’s right, a trailer. Trailers for touring are a nightmare: heavy, cumbersome, hard to handle, hard to store. If you can get away with not using a trailer, don’t use one. I’m well amazed at what the Surly 24-Pack Rack could handle.
All this gear had to be tied down, and to do that, I utilized Surly’s Junk Straps and Loop Straps. I strapped down my Pack separate from my snowshoes, since I didn’t need the shoe to come off an on as much as I may want my pack to, and I was happy to have both kinds of straps available to me. They’re simple things, but def. a step up from what I impulsively turn towards: bungee chords. Really tightening down gear – and having it stay tightened down worked flawlessly and I had nothing spontaneously eject off.
Next, we’ll take this beast on its maiden voyage, over the Continental Divide (somehow…) and into Summit County via the Great Divide Mountain Bike Route!
Part Two

[…] Surly ECR and the Surly 24-Pack Rack: Initial Impressions […]
Hey, Justin, nice review. Where, oh, where is Pt Deux? And what about pedal strike? On the edge of my seat here… Thanks!