Like this? Follow me:
At a Glance
- Pros: Comfortable, roomy, extremely well-designed
- Cons: stuff sack to use as bikepacking bag is a great idea, but may need to be further developed as a solid feature
- Weight:
- Tent Stakes/accessories: 121 grams
- Stuff Sack: 111 grams
- Tent Poles: 363 grams
- Rain Fly: 348 grams
- Tent Body: 337 grams
- Integrated Footprint (sold separately): 169 grams
- Total Packed Weight: 1.13kg
- Interesting To: Bikepackers and Ultralight hikers who want a tent rather than a tarp/bivy setup
- Best For: Those who seek comfort and privacy only a tent can provide
- Price: $399.95, Ground Cloth: (suggested): $65
- Purchase: REI | Amazon
Big Agnes has come out with a bikepacking specific line of ultra light tents, designed with unique features to fit this expanding niche.
I’ll start this review by talking about the various parts of the tent and the accessories that come with it, setting the tent up, and lastly, my initial impressions. In a future part of this review, we’ll take the tent out for a few nights bikepacking.
Breakdown
Stuff Sack
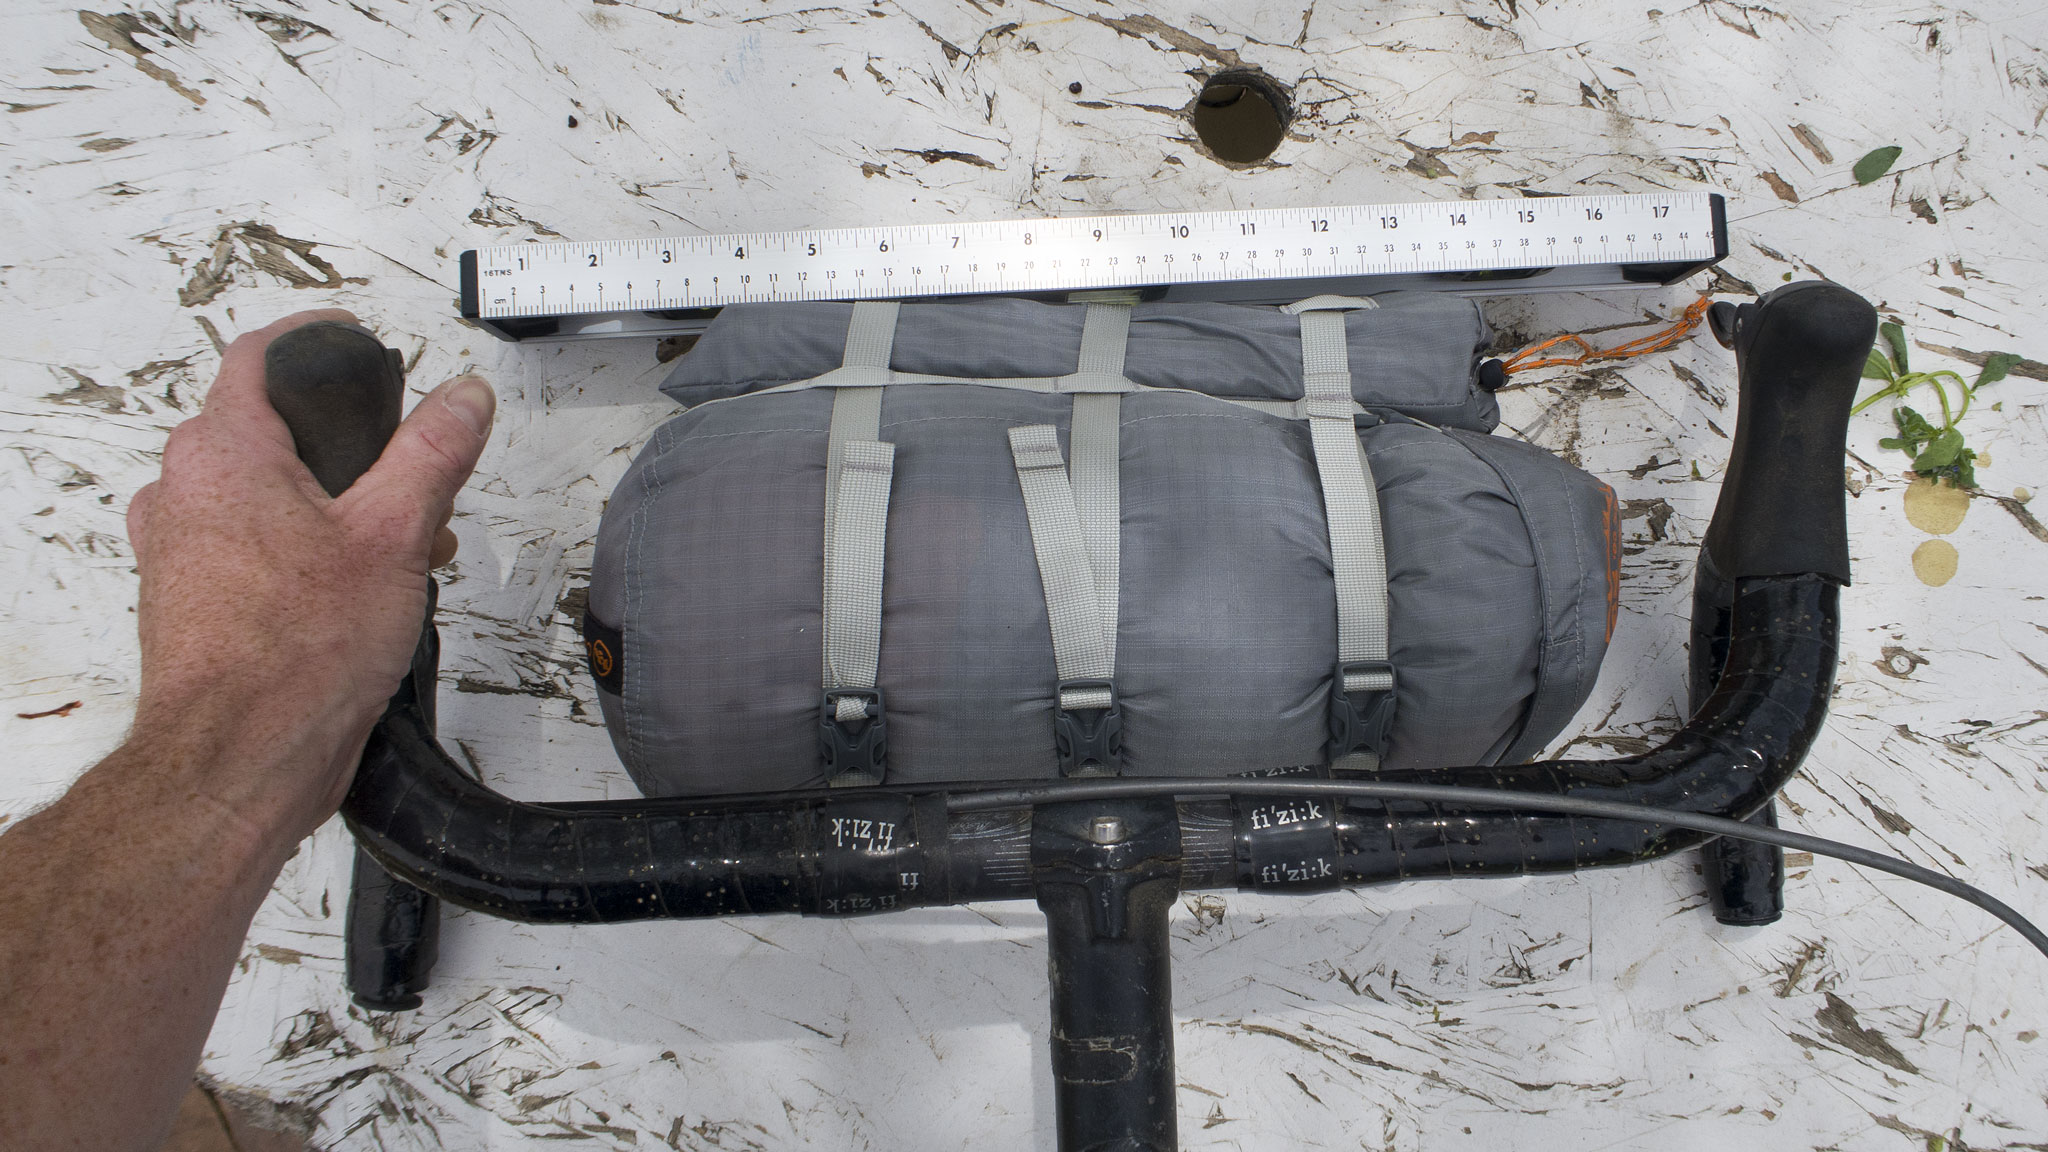
The bikepacking version of the Copper Spur HV UL1 Bikepack tent comes in what’s hard to simply call a “stuff sack”. The tent’s compression bag is fairly beefy, and is ready to be utilized to transport the tent itself as its own bikepacking bag. The tough, ripstop, waterproof silnylon material has taped seams throughout, and sewn-on daisy chains to lash on accessories (examples: your sleeping bag, and sleeping pad).
A separate bag is fully integrated with the main bag to hold the tent poles and stakes, keeping them from damaging the fabric of the tent itself. Three plastic snap buckles run the diameter of the bag, and one hook cinches the opening of the main stuff sack tight.
That’s a lot of ink spilled just for the stuff sack. Lots of thoughtful detail is seen throughout this bag’s construction – and this theme seems to be carried throughout the actual tent’s design.
Tent Poles
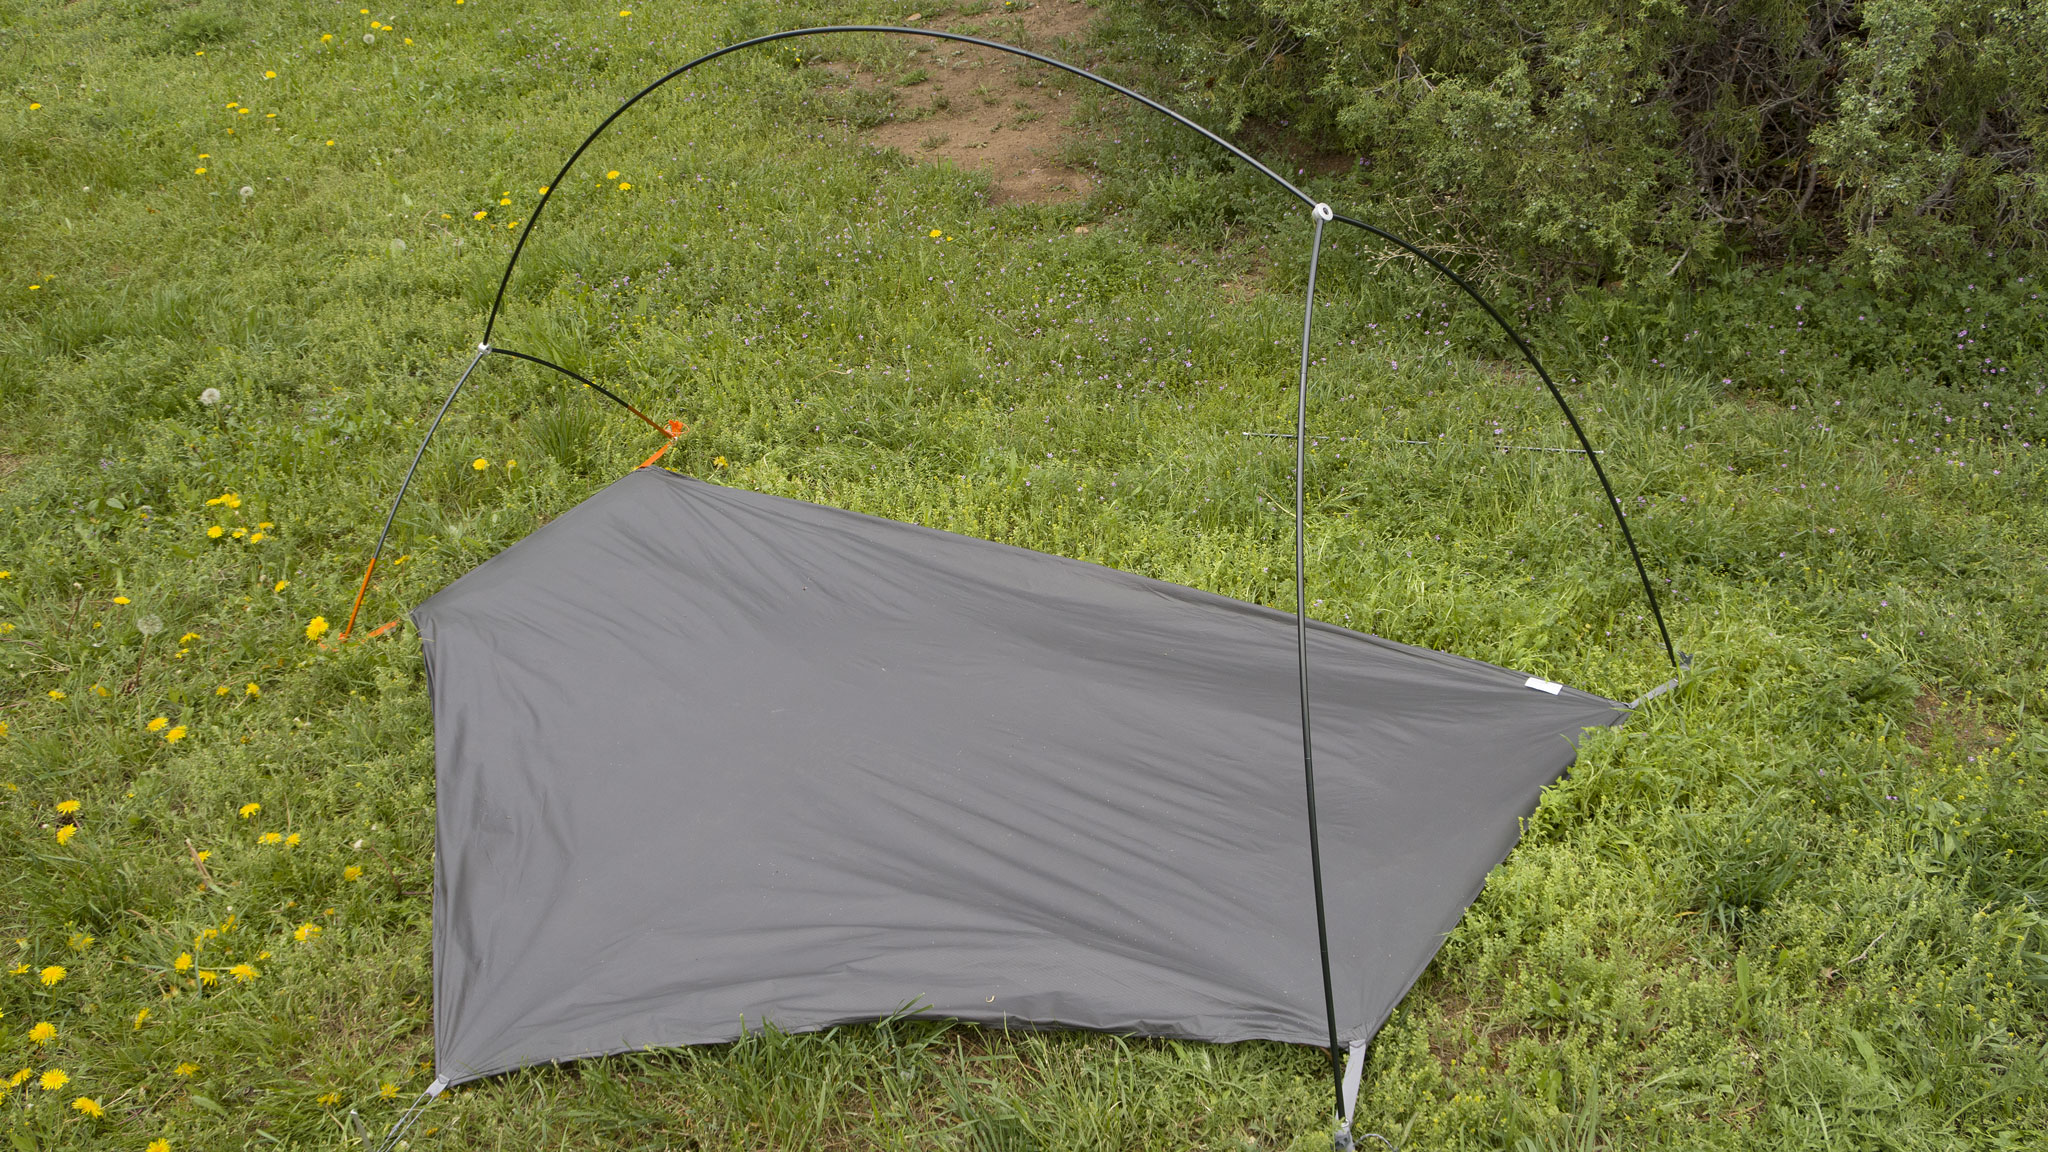
Copper Spur HV UL1 Bikepack tent comes with two separate poles: the main backbone which has attached branches for the front aft of the tent, as well as a much smaller pole that sits at the top of the tent, providing some lateral support.
The main backbone poles are color-coded (as are the plastic snap buckles on the rain fly), facilitating putting the tent together. Look for the anodized poles and snap buckles colored orange – they belong together.
I appreciate that there’s not a mess of separate poles to deal with, both when figuring out what poles go where, but also when putting the tent away – less stuff to lose or get mixed up, the better. I also appreciate that I don’t have to stuff these poles into a long sleeve on the tent fly – that scheme always seems to slow-down breaking down the tent.
The tent also comes with a larger-diameter tent pole segment, in case you snap a pole during a trip. A little bit of tape and this pole segment, and you’re back in business. I’ve only broken a tent pole once during a fairly intense wind storm on top of a 12,000′ ridegline (a ridiculous situation), so it’s not something I’d anticipate happening on a normal trip, so long as you’re not abusing the tent itself.
The tent poles themselves are segmented a little shorter than you may be used to – they’re only around 12″/30.5 centimeters long in the official spec. provided by Big Agnes. I’ve measured them to actually be a little shorter. For trip planning purposes, go with the 12″ length.
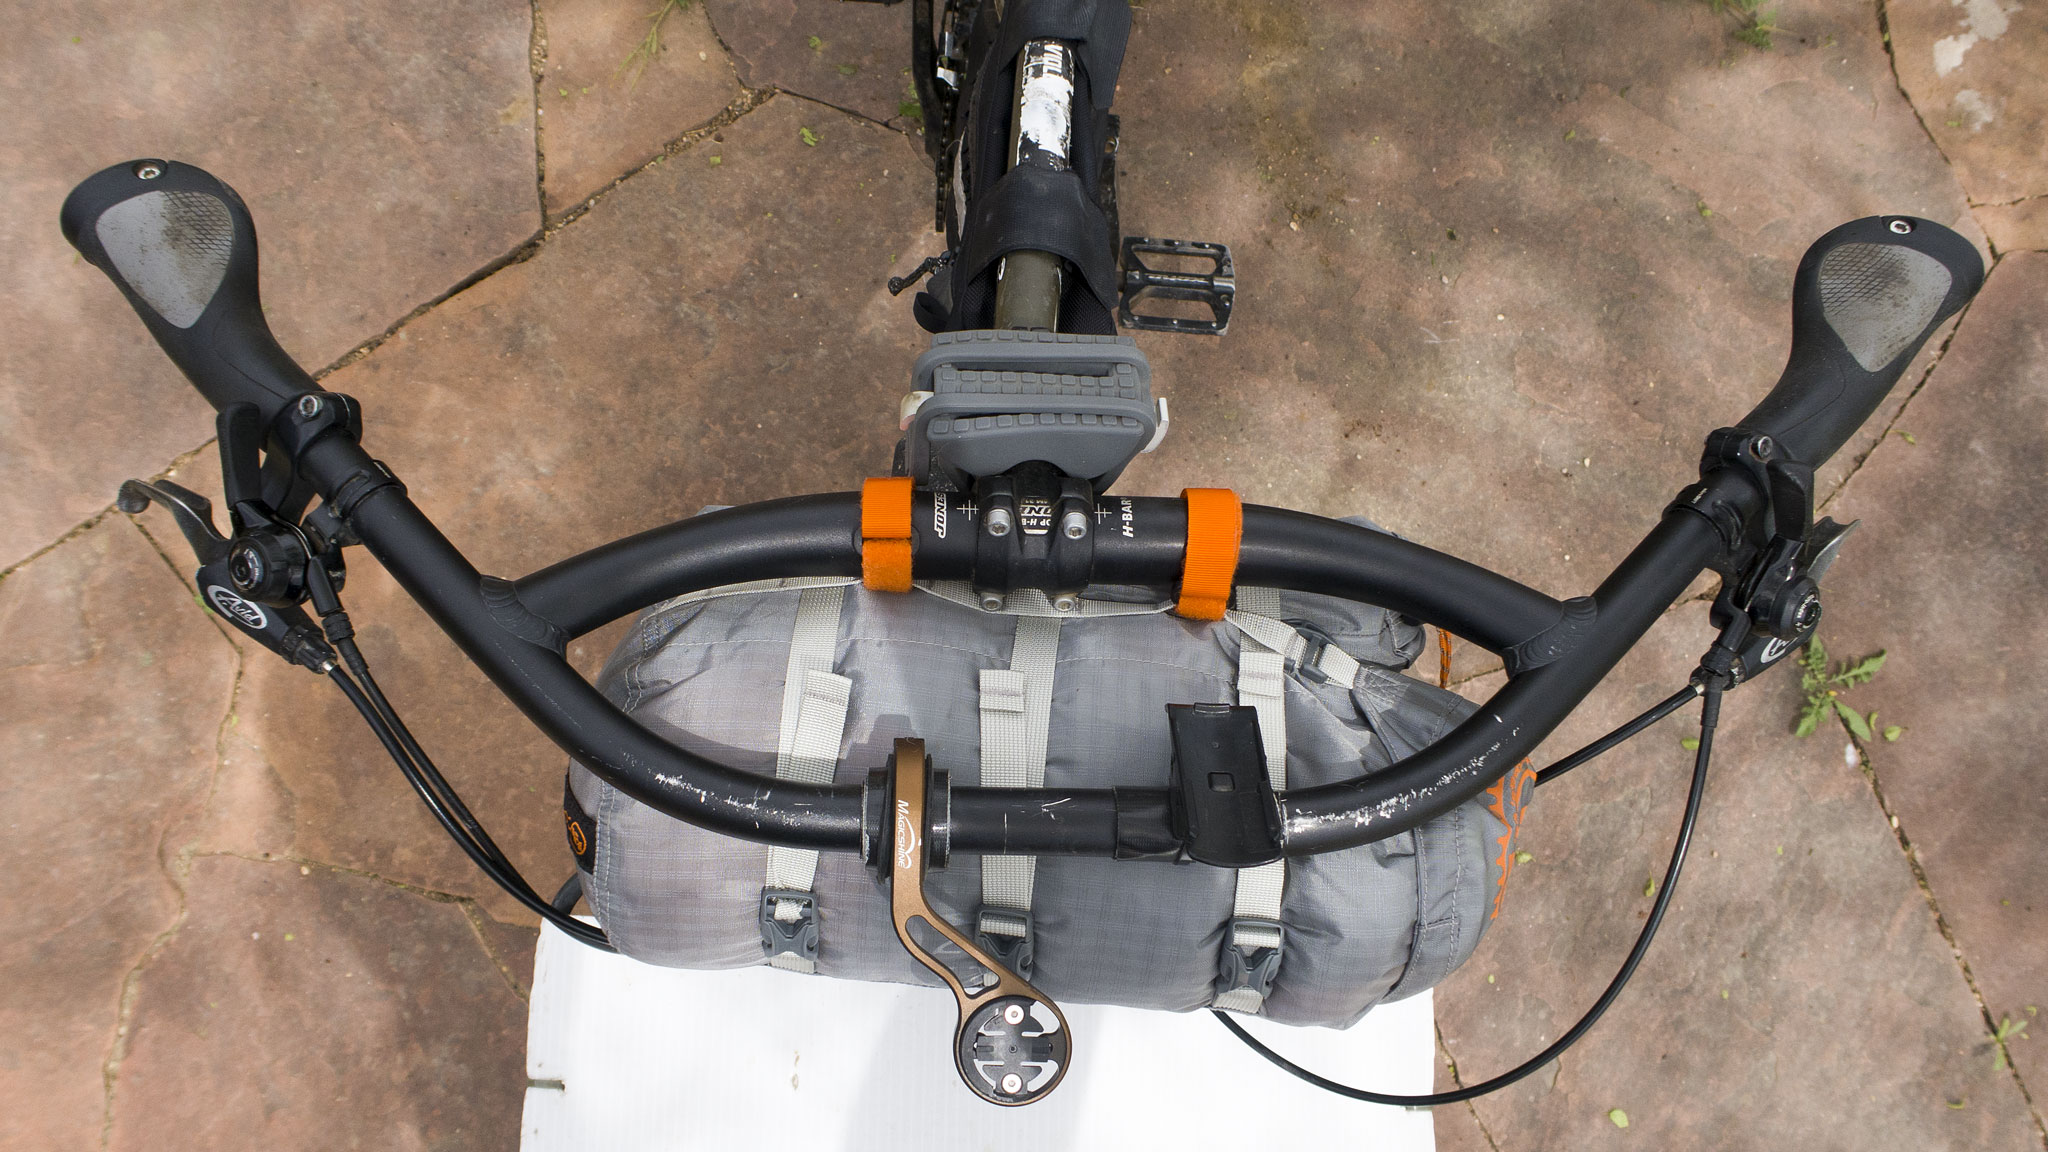
Big Agnes has made this design decision so that the entire packaged up tent is relatively squat, fitting neatly in between your drop bar handlebars, or so not to interfere with brake levers and shifter bits on flat, riser (or my fav) Jones H-Bar-style handlebars.
Tent Stakes
Seven stakes are provided with the Copper Spur HV UL1 Bikepack tent . These stakes are small – I wouldn’t suggest replacing these with anything smaller than these, as it’ll just lead to all sorts of trouble.
The four corners of the tent may be staked, as well as the tent’s opening and opposite side, making a small vestibule at the tent’s one opening. The middle of the front of the tent may also be staked.
Integrated guy lines are also present that may optionaly be staked down (move the stakes from the tent body to the ends of the guylines) on the front of the tent for those extra windy nights.
As I’ve hinted at, there’s a lot of options when it comes to setting up this tent, depending on your wants/needs – we’ll explore some of these setups, later on in this review.
Optional Footprint

The Copper Spur HV UL1 Bikepack tent has an optional footprint that’s sold separately. Purchasing a tent’s footprint is an easy and cheap way to help protect the investment of the tent itself, and it’s something I would almost always suggest purchasing along with the tent.
The footprint extends beyond the tent body itself, and mirrors the rain fly’s reach, making the vestibule area also protected from the ground. A nice touch.
Setting Things Up
Setting up the main body of the Copper Spur HV UL1 Bikepack tent was easy. I imagine how I would feel after a long day of riding, and then needing to complete the task of setting up my shelter before I can sleep: perhaps the weather isn’t the best and I’m in a rush. Will the experience of putting up the shelter be a stressful, or relieving experience?
Tent poles, snap buckles, and metal rings are all color-coded. On my model, all the orange parts go together. The waterproof silnylon bottom faces the ground. Snap in the poles into the corners of the tent body and place the poles into the hooks that run along the spine of the tent body The tent fly goes over the main body of the tent and snaps in at the four corners, just like the fly. Just make sure the tent’s opening and the fly’s opening align with each other.
This tent is freestanding, but you can also stake it in for more security. Staking down the tent will stop it from potentially blowing away, as well as give you a little more room inside. The tent will also be much more water resistant during a rain storm. Stakes can be put in at the four corners, as well as at the middle of the longer sides, creating a small vestibule on the side you can open. A seventh stake can be used in the middle of the shorter side.
Tent Body
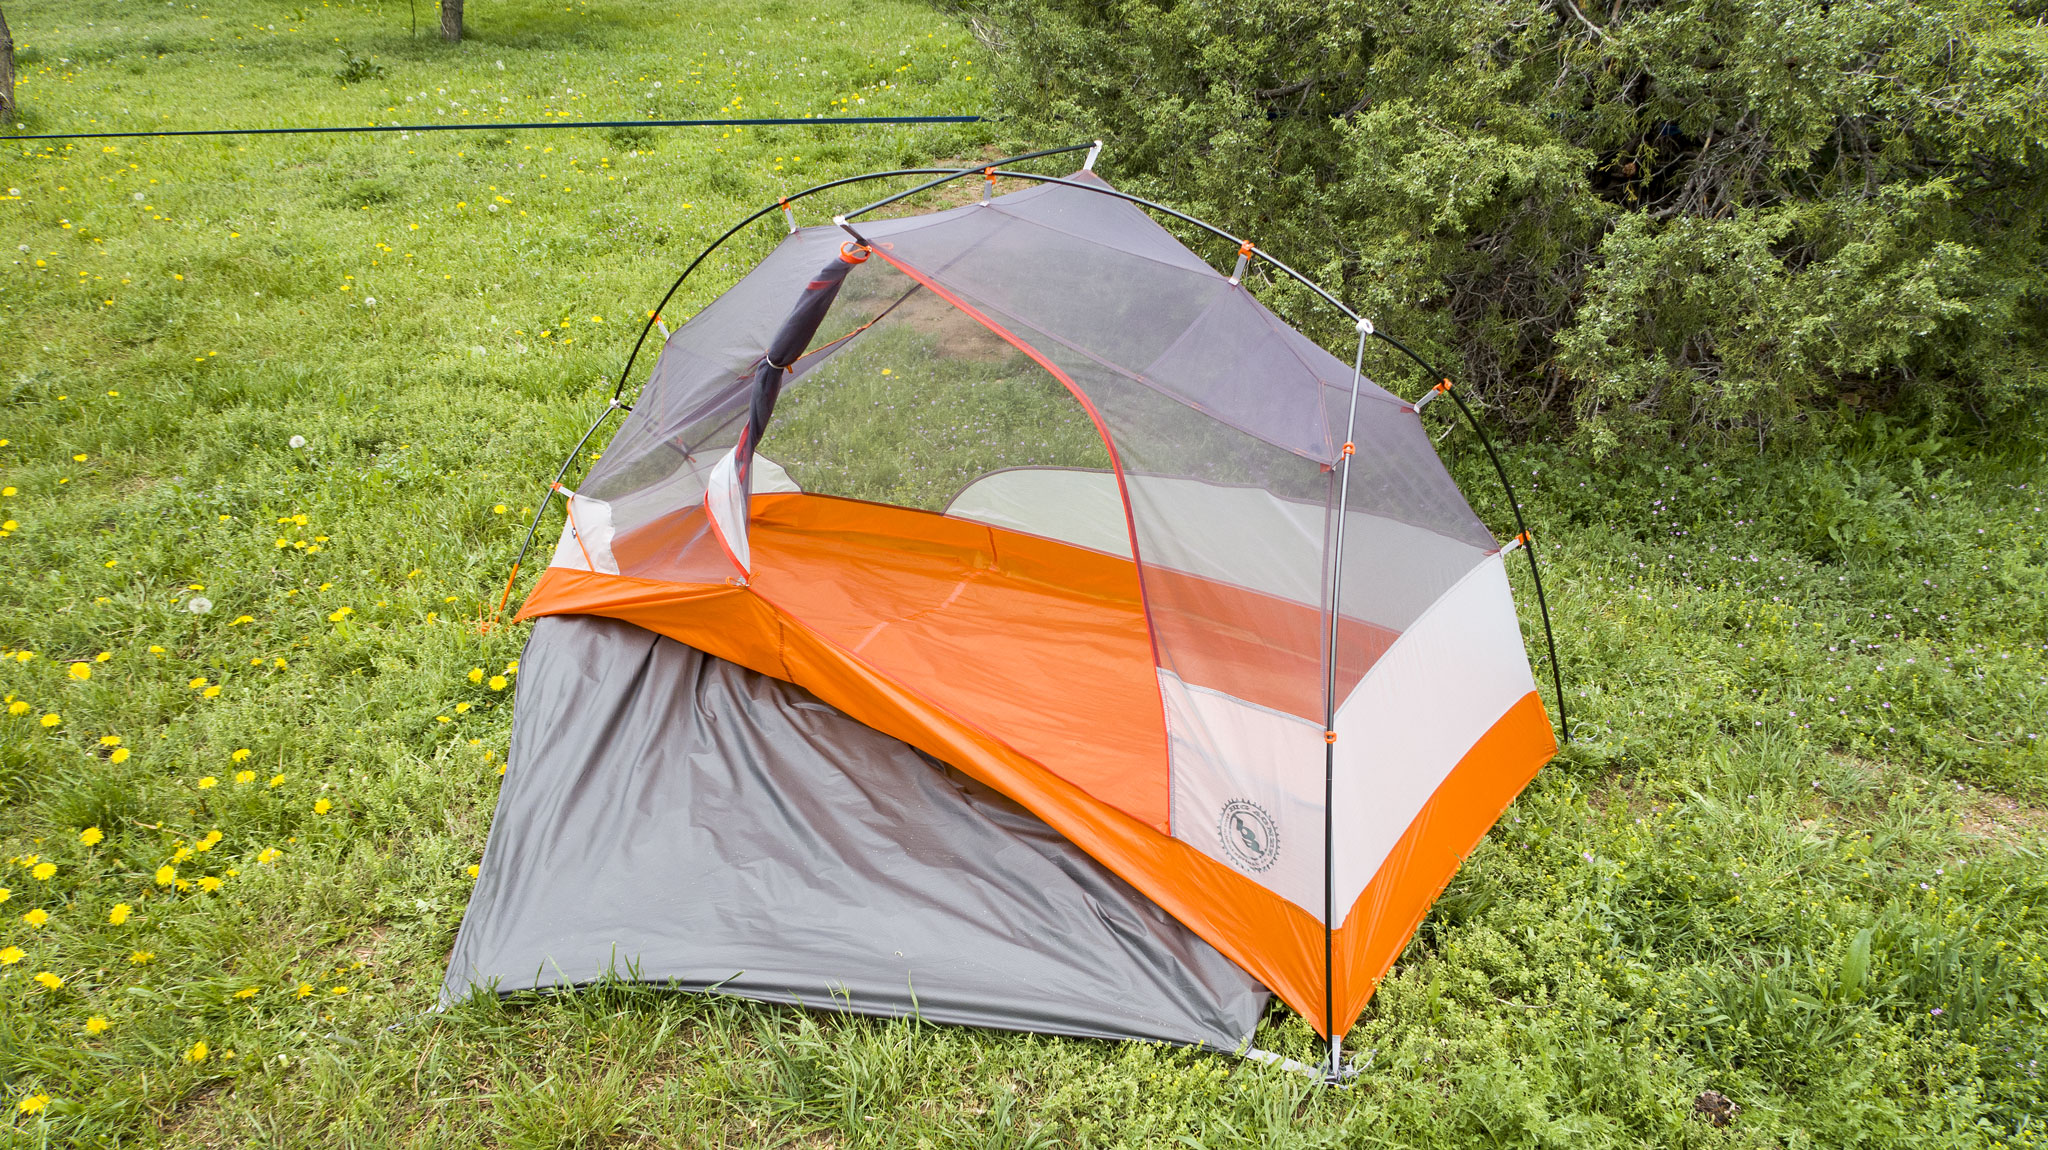
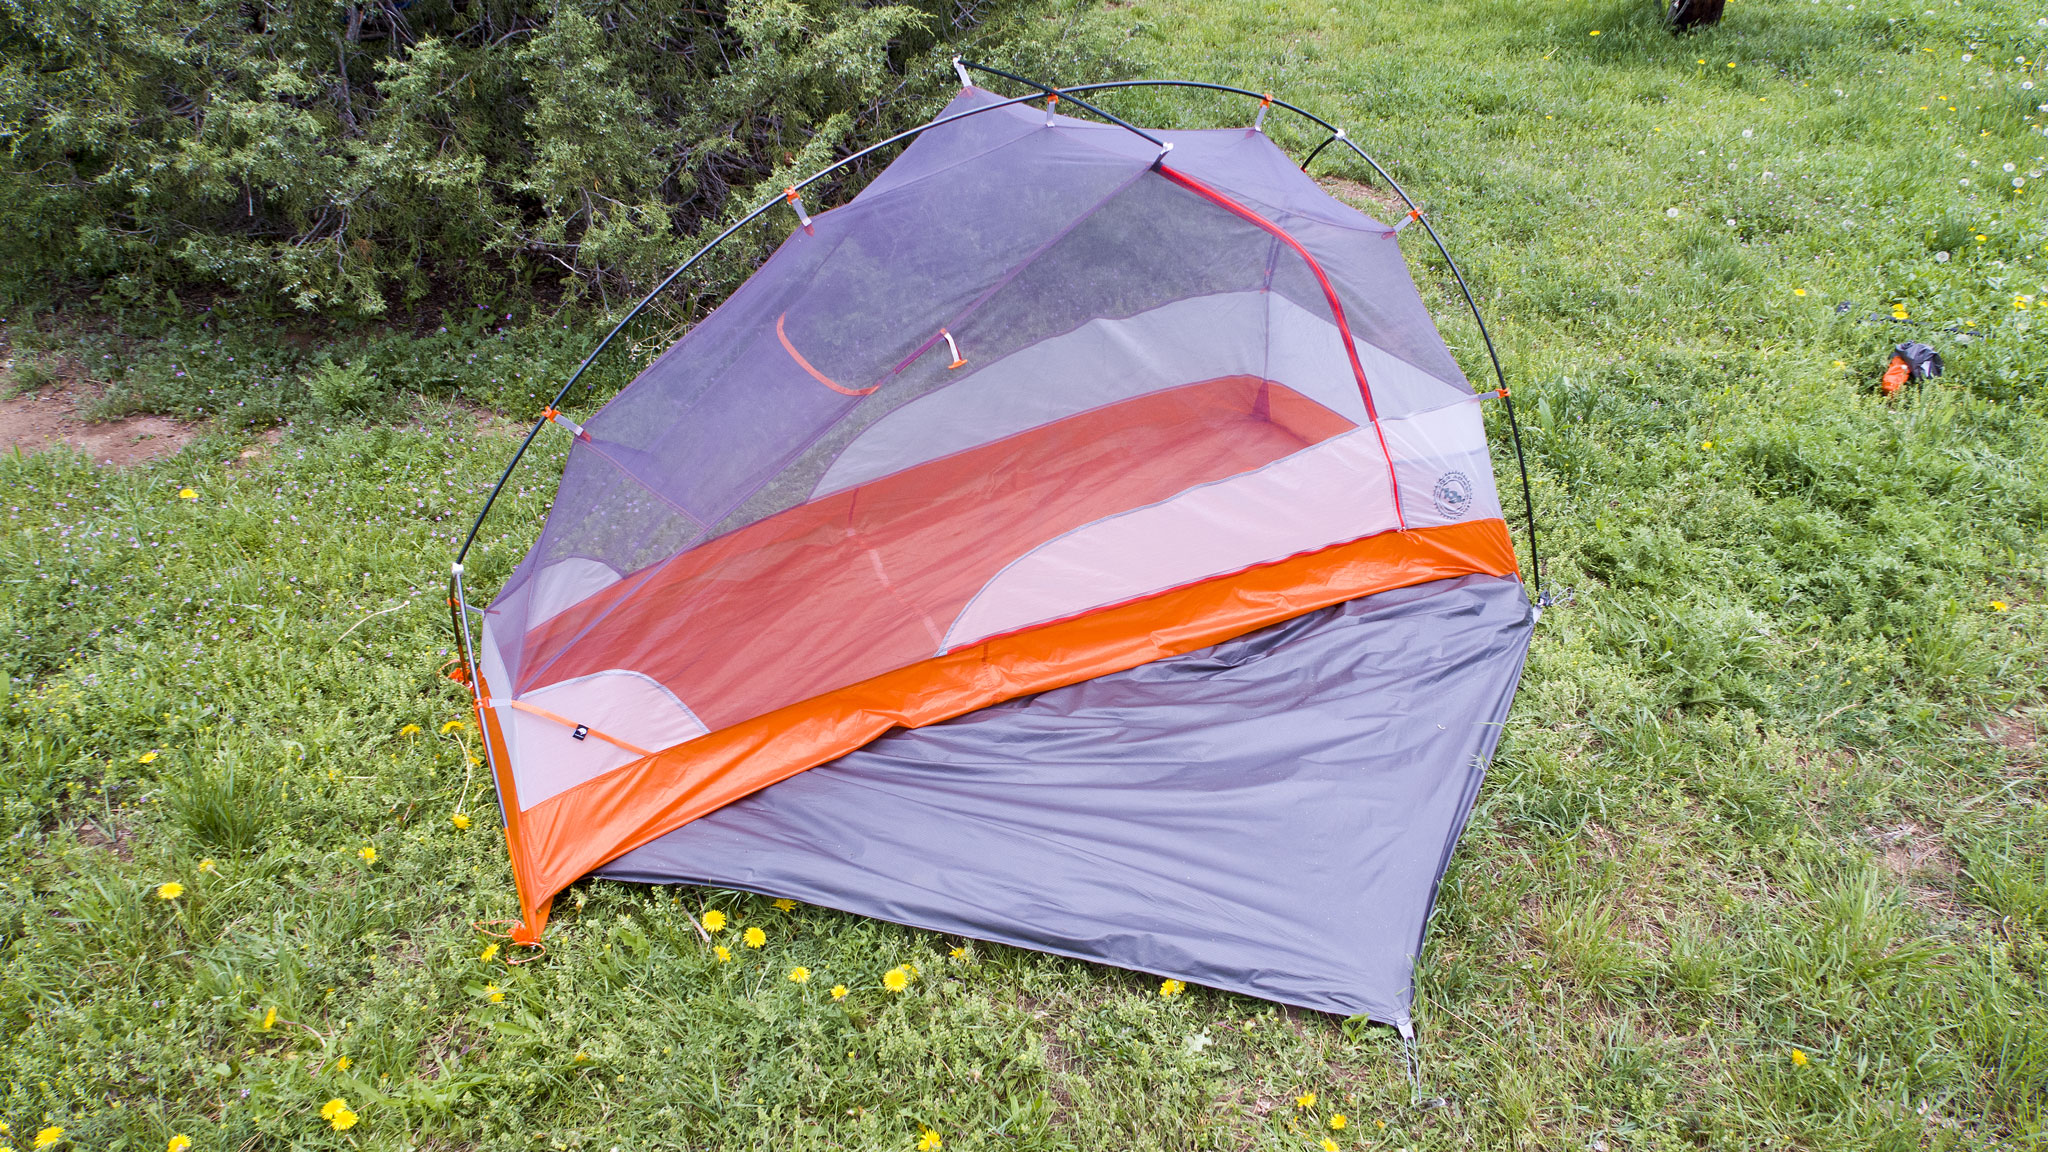
The Copper Spur HV UL1 Bikepack tent body is mostly made of mesh materials of two different tightness of the mesh itself (the tighter being lower down), with a generous waterproof sil/nylon bottom that wraps around towards the top a few inches. Each of the tent’s four corners provide metal rings to place the ends of the tent poles in. The top of the body provides hooks to attach the tent poles. Once the tent poles ends are placed into the corners of the tent, snapped into the hooks, and the horizontal bar is put on top of the tent, your tent has been set up!
Only one side has a double-zippered opening, which isn’t too much of a deal-breaker, as this is a one-person tent. This design decision helps keeps the weight of the tent down (zippers are surprisingly heavy).
The interior of the tent has many pockets to hold personal items like toiletries, glasses, a headtorch, or anything else you want in arms-reach while you snooze. One pocket is designed specifically to hold your phone, allowing wired headphones to drape down from above.

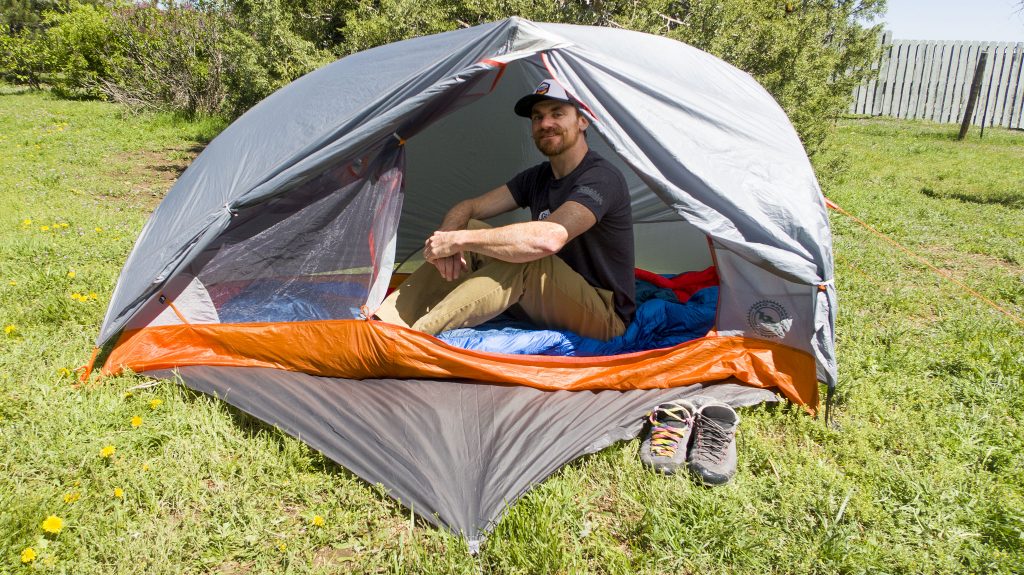
A particularly large shelf is available – Big Agnes calls this their, “3D Bin Pocket”, located from the roof of the tent by your feet. It’s large enough to hold say, an entire outer layer at the ready for midnight sojourns outside of the tent to answer the call of Nature. The interior of the tent itself measures 38″ at the foot of the tent, and 88″ at the head. At its apex, the roof of the tent is 38″, enough for me at 5’11” to sit comfortable on my butt without feeling cramped, which I am very pleased about. It’s not so fun to attempt to do Tent Life with a aching neck from cowering down while performing every task imaginable.
The tent itself, despite its relatively small footprint, makes sure to have all the space be usable space. This smallish footprint is beneficial when selecting a prime site to set up. I own tarp systems that have a larger footprint than this tent.
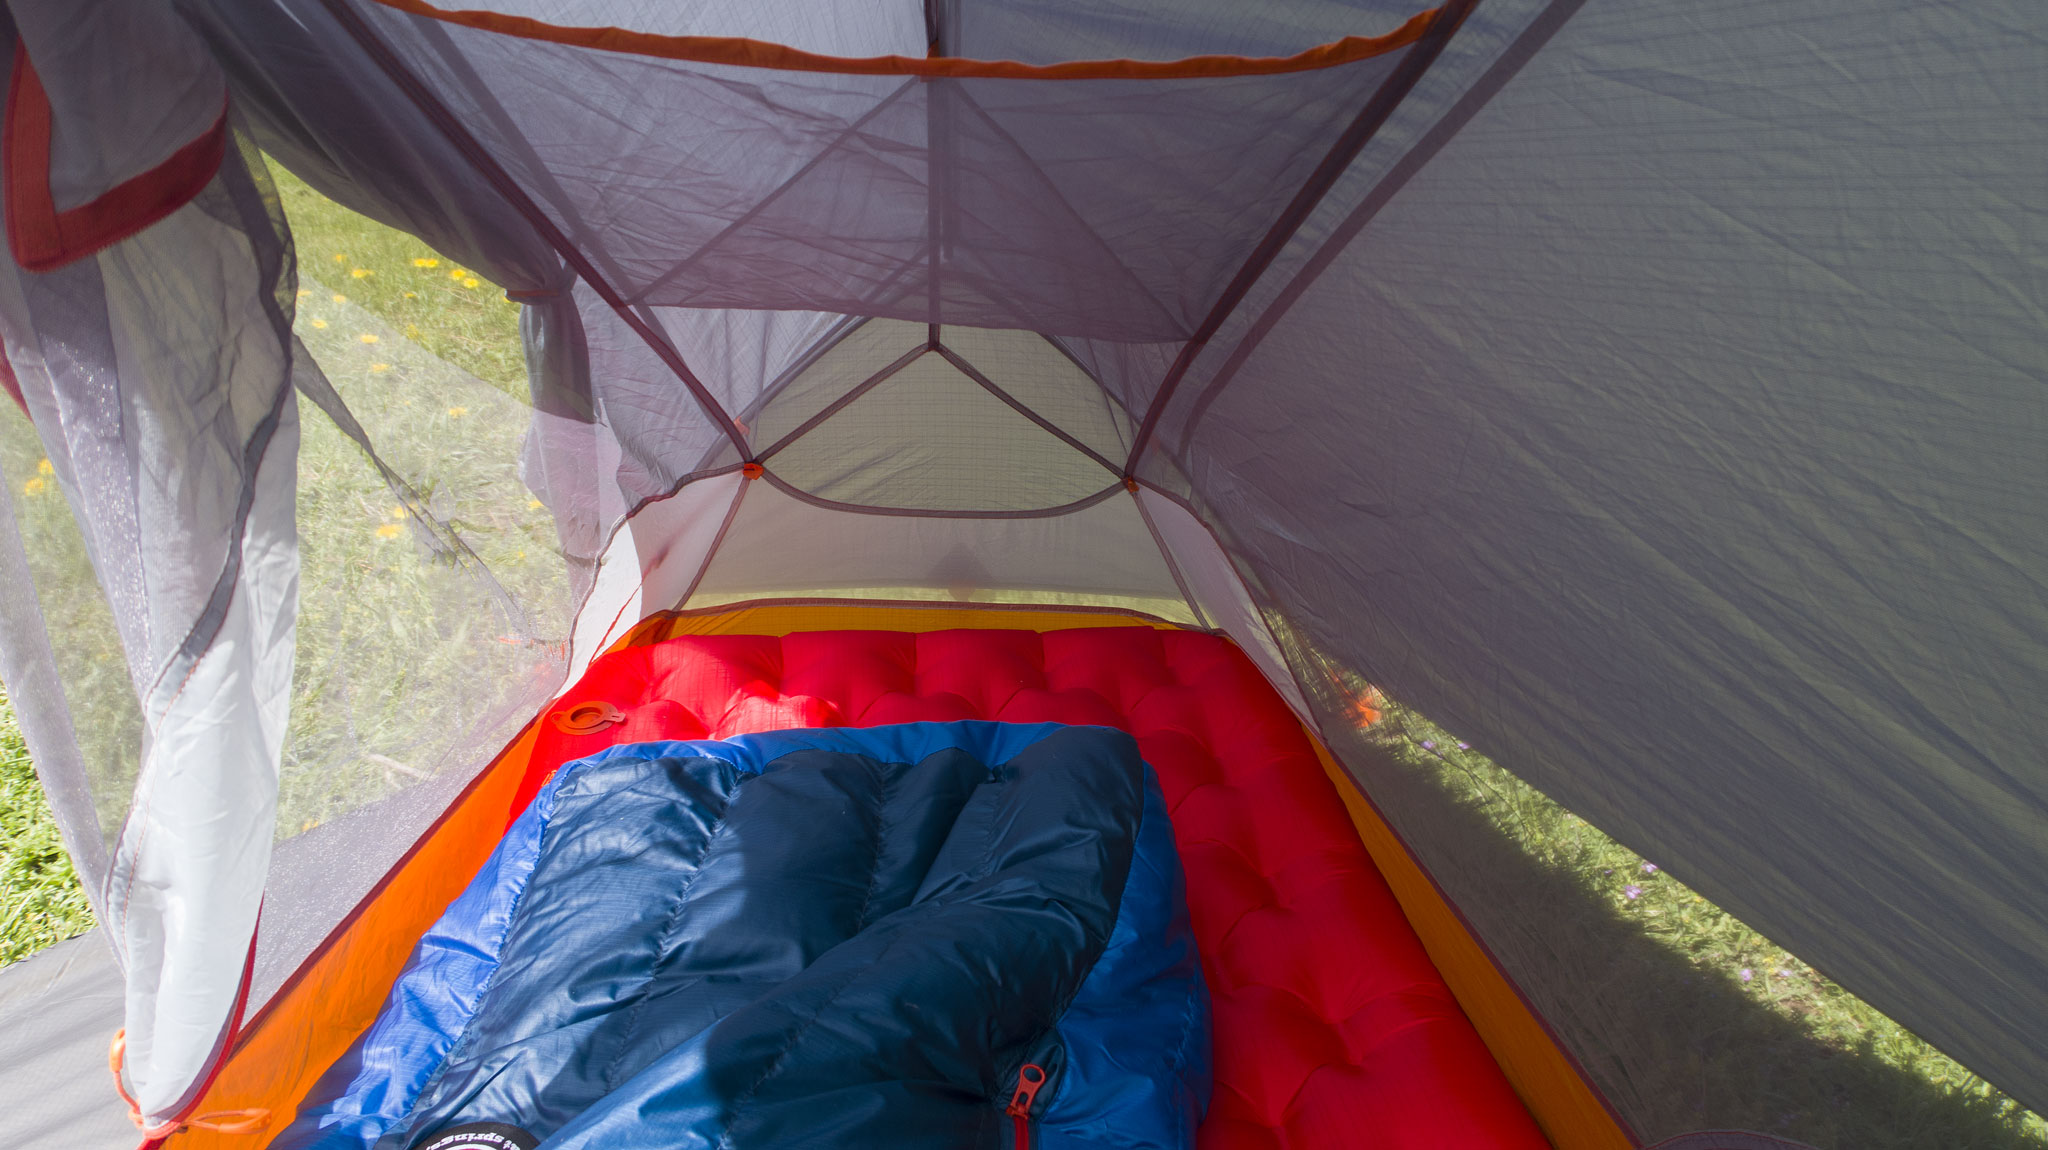
The interior of the tent is large enough to fit integrate well with the width/length of the Big Agnes Insulated AXL Air Long (35″ x 78″) sleeping pad, so all other sizes smaller than this pad should work well, too. The Big Agnes Anvil Horn 30˚ Long sleeping bag fits well on top of this pad too, which should now come at no surprise given how detail-oriented the Big Agnes team has proven to be.
Configuration Options
The Copper Spur HV UL1 Bikepack tent can be configured in a few different ways, depending on which role you would like it to perform. Here’s a few that I’ve found to work well:
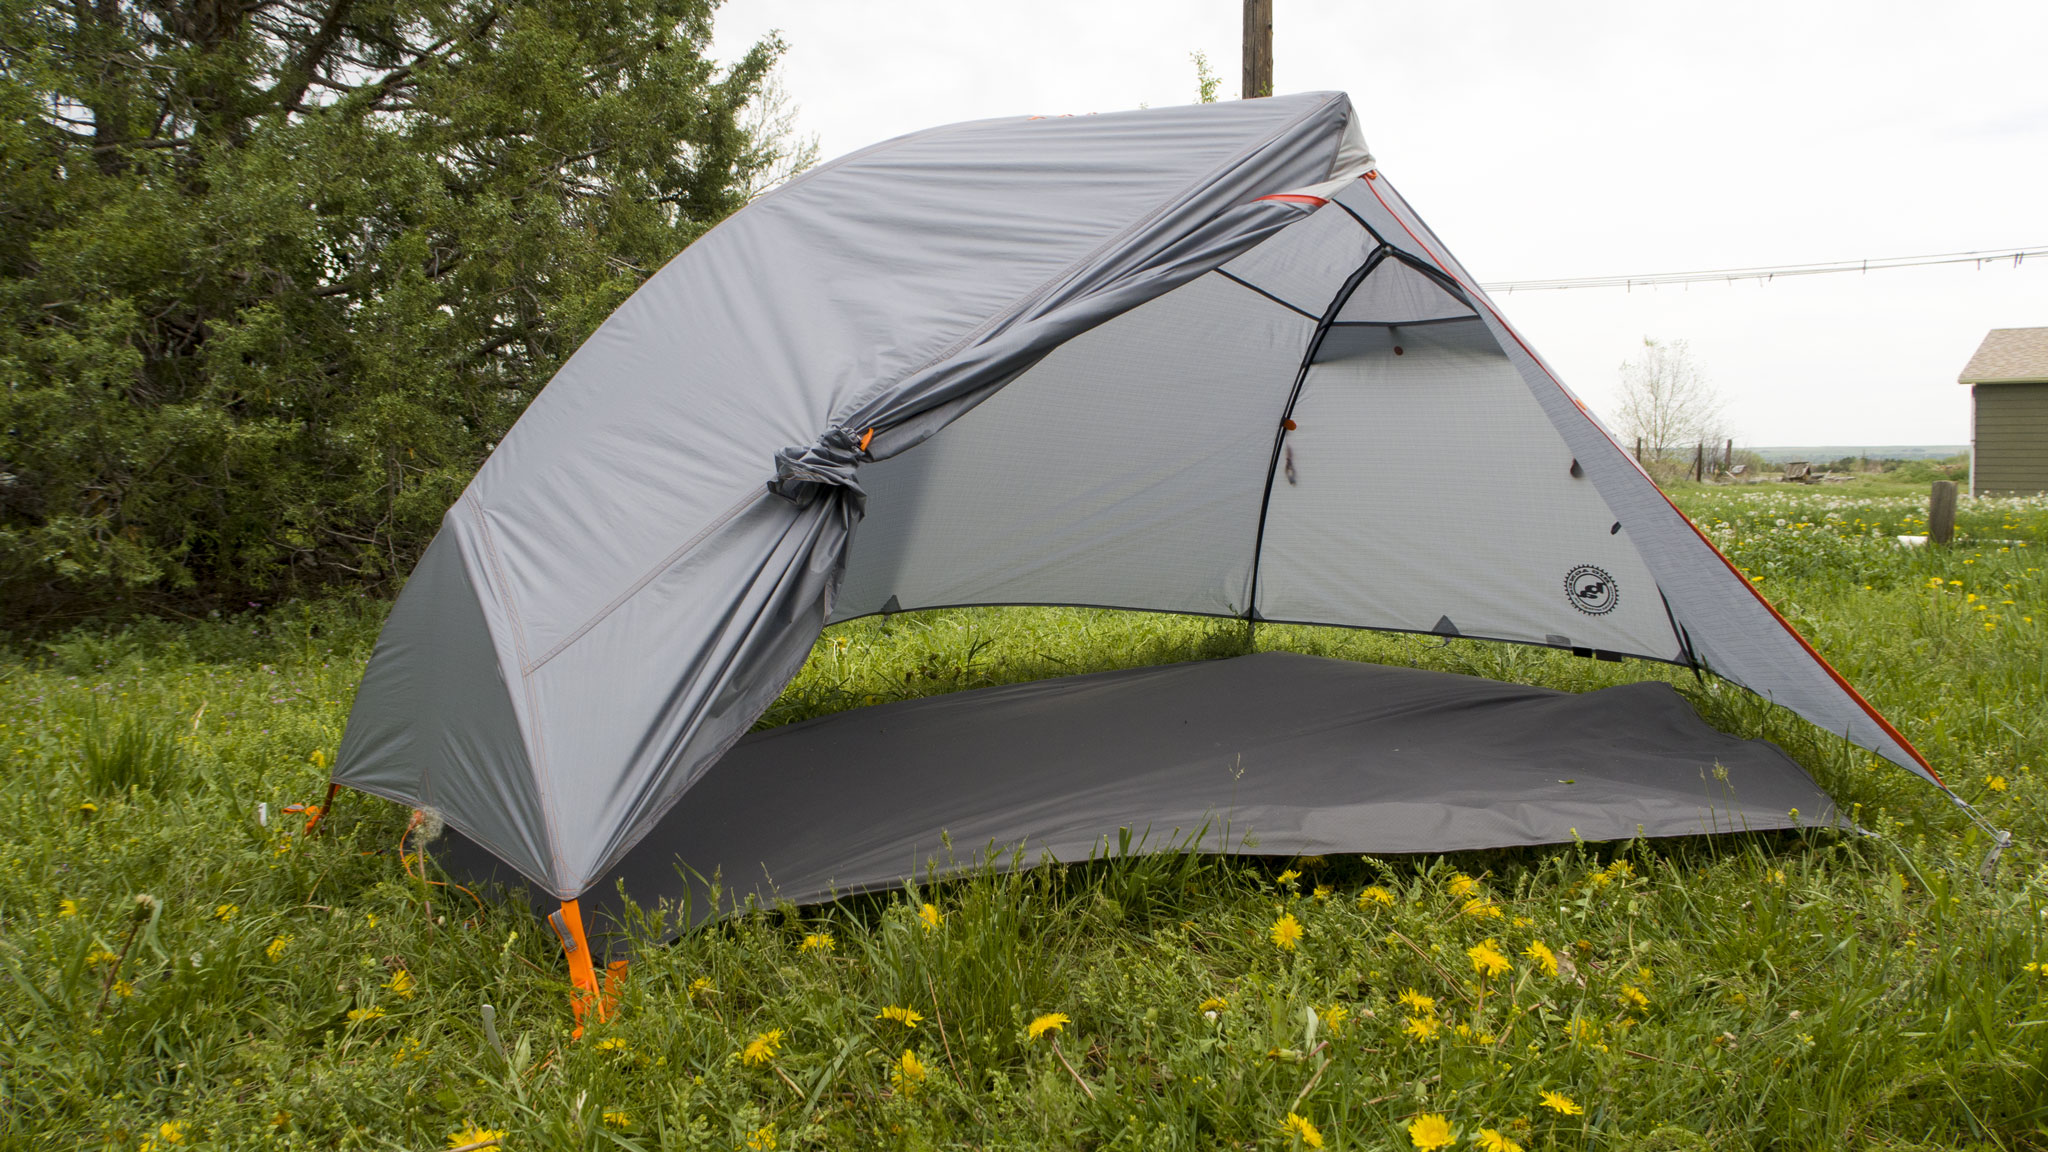
Tent Fly Optional
The Copper Spur HV UL1 Bikepack tent works just fine without the rain fly. This is a nice configuration if you would like maximum breath-ability, and would like one less thing to set up before going to sleep. The tent in this configuration will not require staking down. Weather resistance, obviously, won’t be very good, but you could always put the tent fly on, if you start feeling rain falling.
Tent Body With Tent Footprint (Fast Fly).
setup
If you purchase the optional footprint (which again: you I would suggest), you can then use this tent while leaving the tent body itself at home, cutting down a considerable amount of weight: the tent body alone weighs 337 grams/~12 ounces. You’ll still have to use the tent poles and staking the tent will now be required rather than optional.
The tent itself will still be weather resistant, but not bug-proof. Another benefit is that tent will become a little more spacious, as the vestibule area will completely bleed into the main tent body.
This is a great configuration for those that find a bivy/tarp system a little too minimal, and want to level up slightly.
Bikepacking-Specific Features
So, what makes the Copper Spur HV UL1 Bikepack tent bikepacking-specific?
Bikepacking Bag-Worthy Compression Sack
As mentioned, the “stuff sack” this tent comes in is waterproof and quite burly, being designed to carry the tent itself while lashed onto, say, your handlebars (an assortment of velcro straps are provided). The entire package is narrow enough to minimize how much interference the bag itself will create, either in the center of a drop bar setup, or the brakes/shifters of a flatbar-style setup.
Shortened Pole Segments

The pole segments used in this tent are listed in the spec. as being 12″, but measure slightly less if I’m being pedantic. This is to make stowing them on a bike a little more convenient and to support the narrow compression sack.
Webbing for Dry Helmet Storage
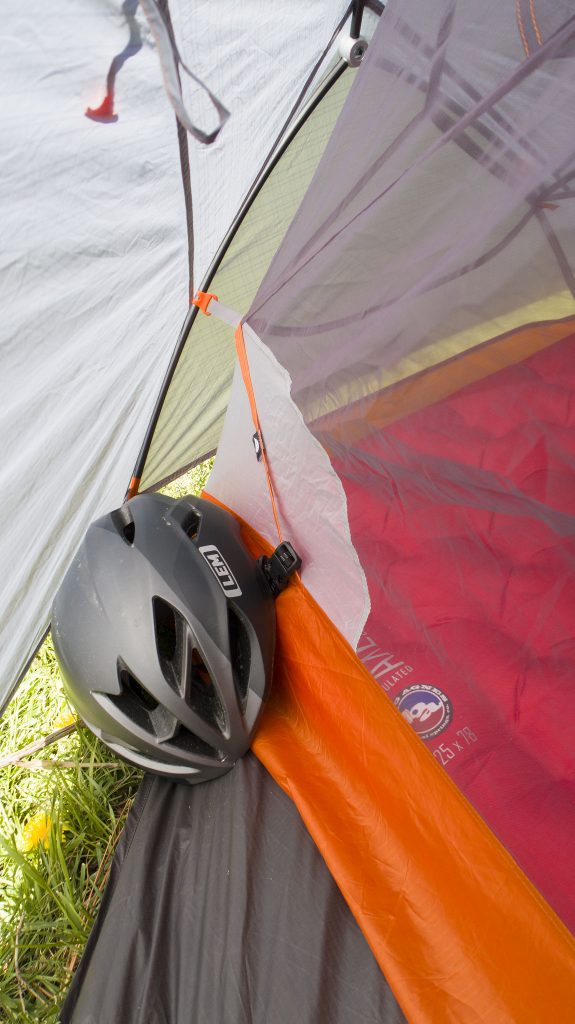
A small feature sure, but this tent utilizes some dead space between the rain fly, and the tent body to store your helmet, mostly so that it doesn’t run off in the middle the night!
Initial Impressions
Strengths
It’s overwhelmingly apparent that this is a quality tent and that’s what you’re being for the price of the tent itself. The tent integrates well with many of Big Agnes’s other products, like their sleeping pads and sleeping bags.
So many small details done right come together to make this a great tent experience. One of my favorite the highlights are the 3D Bin, which really does make use of what usually is unused space. I also appreciate just how much headroom is available, as well as so many little features that sometimes are missing from ultralight offerings (the multiple gear pockets inside, the daisy chain webbing to dry items on the outside of the tent fly, etc).
Weaknesses
My main critique with the tent as a whole is with the stuff sack it comes with, which pains me as I can tell a lot of thought was put into make this lowly part of the system be such a standout.
I think the idea of burly bag you can use to lash on your handlebars is a good one, but there’s still not quite enough flexibility with this bag alone to also lash on the rest of your sleep system: your sleeping pad and sleeping bag.
In a UL bikepacking setup, where are those items supposed to go? The included velcro straps to fix them onto your handlebars is also a nice touch, but they don’t have that feeling of utter bombproof that I want from a legit. bikepacking bag system. The shortened tent poles may be the most desirable part of this bikepacking-specific tent.
I’d love to see the Big Agnes design team further this idea in future iterations of this tent. For now, I would suggest using something like a Revelate Designs Sweetroll, and stuffing this tent, your sleeping pad/bag inside. Save 111 grams and leave the tent’s stuff sack at home.
All the little design features and level of detail of the tent, when coupled with trying to make this tent as lightweight as possible does make me a little concerned about some of the toughness of the tent itself. I found the zipper on the tent’s fly that opens up into the vestibule area to be a little on the smaller side, so be a little careful not to force the zipper open/close or you may damage the zipper itself.
The integrated guy lines are also very small in diameter, making what is already something that tangles very easily, even more apt to do so. The tent stakes, as I mentioned, are also pretty small – I’d almost want to see them one size larger. As they stand, they’ll do the job, albeit barely.
What’s Next
In a future post, we’ll take this tent out for an overnighter, and see just how it works out in its natural habitat.

[…] Review: Copper Spur HV UL1 Bikepack Tent by Big Agnes […]