Like this? Follow me:
I’ve used DIY vapor barrier socks in the past with good results, but I never knew if they actually made a difference than going without. The theory seems sound enough: a ftvapor barrier prevents evaporative heat lose (mass transport) — one of the four ways heat is transferred (radiation, conduction, and convection being the others).
Vapor barriers also prevent any perspiration you do produce from moving into your upper layers, affecting their insulative qualities: wet layers don’t insulate as well as dry. Finally, since any perspiration stays near the skin, a vapor barrier creates an easily noticeable cue — it’s wet! — to then tell you to adjust your layering before you overheat.
Note: there are some benefits of a vapor barrier that I couldn’t find actual evidence for, namely that a vapor barrier keeps a humid micro climate next to your skin which then stops insensible perspiration. That’s too far from my own basic understanding of human biology to personally claim happens.
Design
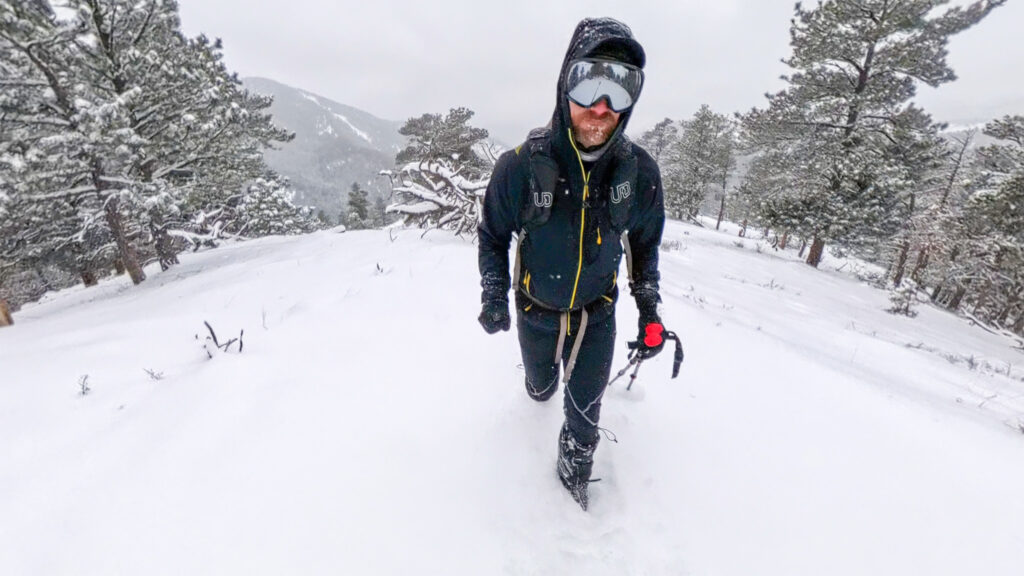
The forecast called for a good dumping: 1-3″ during the night, with additional snowfall the next day — more in the hills. High in the afternoon of 24F. So I got ready for an all-day hike and prepared my boots for the experiment:
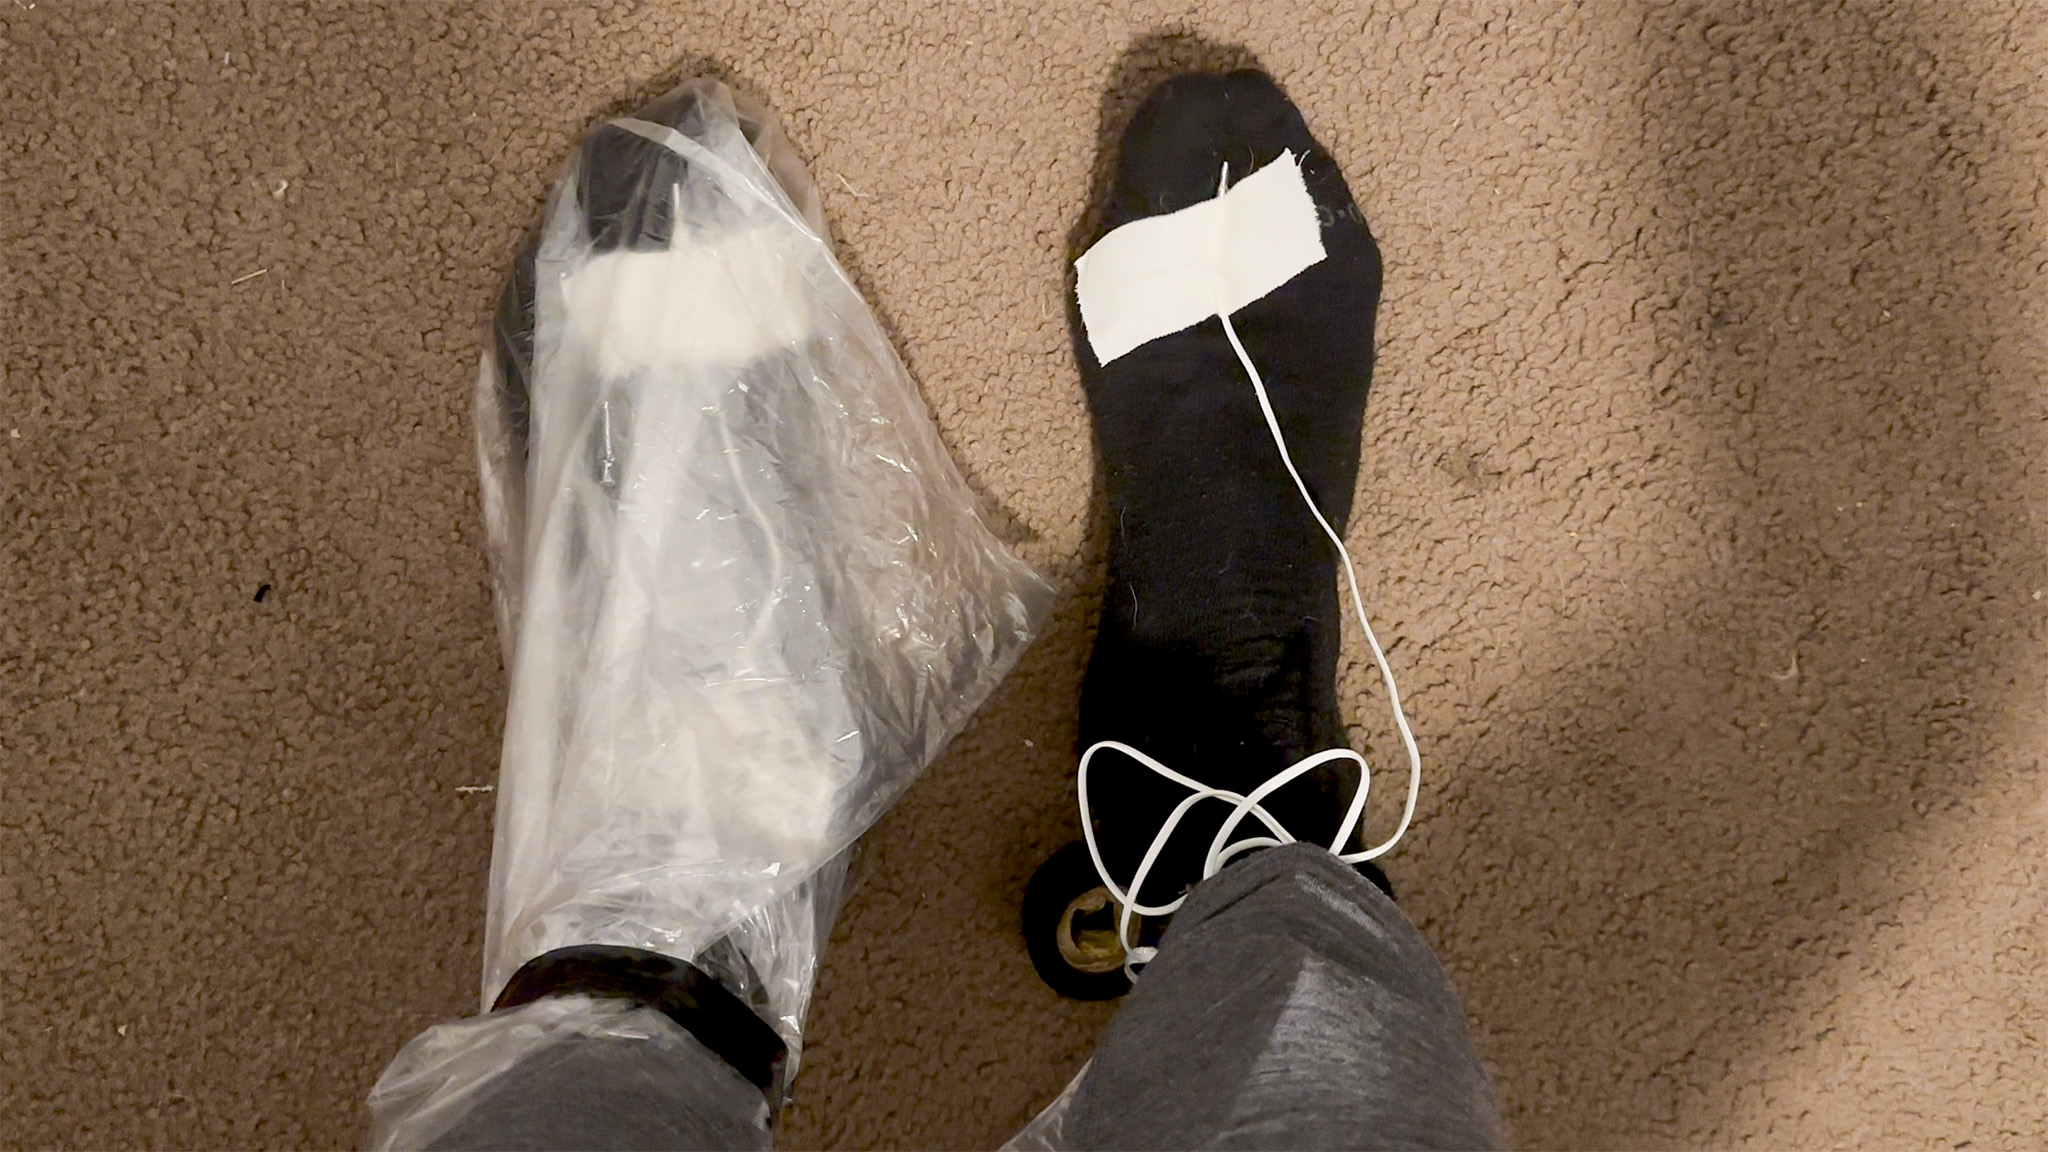
One boot would be my control as it was. I put on a very thin sock liner and between the big and second toe and taped a probe attached to a thermometer to record the temperature every minute. Then, I put on a wool hiking sock.
My other foot was much the same, except that I had a DIY vapor barrier — an oven turkey bag made of impermeable plastic — between the sock liner and the wool hiking sock. I also taped the top of the bag above my ankle to “seal” everything in. I didn’t want any snow that could fall in from the top, nor any sweat from my foot from escaping, throwing off the intent of the vapor barrier.
My hiking boot is the La Sportiva Trango Tech GTX. As mountaineering boots go, it’s very light, without a lot of insulation. These boots aren’t really designed for deep winter expeditions but for Spring/Summer snow climbs. I’ve been using them in Colorado winters for a while and for me, they do provide enough comfort if paired with enough added insulation in the form of a thick wool sock. Over these boots, I wore a pair of lightweight gaiters, so snow wouldn’t enter the top of my boots, prematurely wetting them out.

If anything, I was worried that 24F was going to be too warm to test out a vapor barrier idea while on a vigorous hike. Maybe I would get uncomfortably warm in the vapor barrier’d boot and start to sweat too much. That’s the rub of vapor barriers: they’re best to use in very cold conditions where you can’t overheat easily. Boots aren’t the easiest to take off and adjust your foot’s insulation level, since taking off the boot/sock exposes your wet feet to the cold, while also potentially getting snow in the insides of the boot itself (I’m clumsy). I made a mental note to weigh my sock liners after my hike, to see if I was sweating a ton. I am a generous sweater, although mostly in my lower back.
Finally, I placed a third thermometer inside the top pocket of my pack, to see if I couldn’t record the outside temperature.
Execution
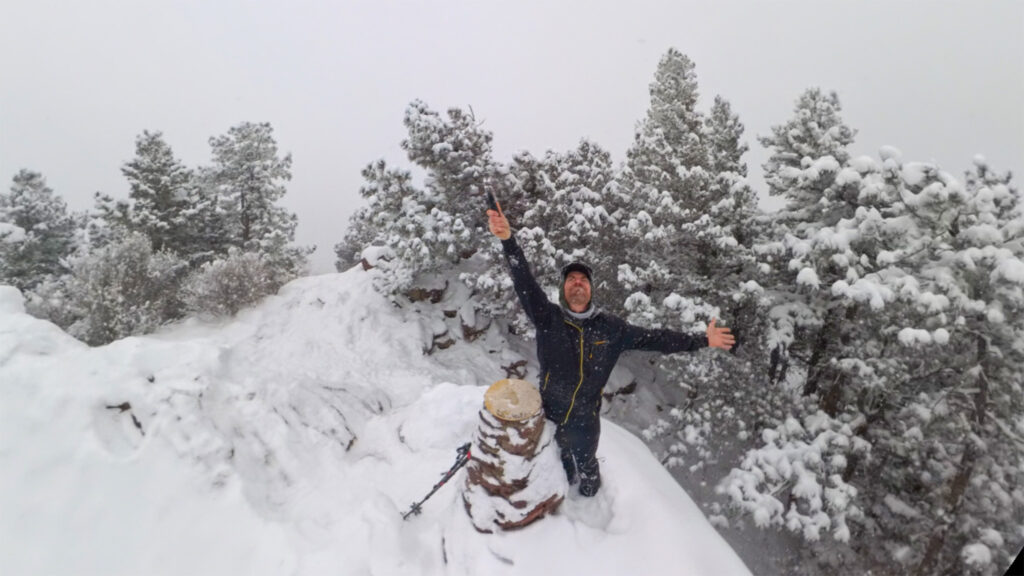
I set off a little after 6:00am right from my front door for a small tour of the local hills, apexing on the summit of Green Mountain, many miles and many smaller hills away. It snowed more than was forecasted the night before, so travel was slow as I made my way to Goat Trail and my first summit: Mt. Sanitas. Being one of the first hikers of the morning, I was ankle to shin deep in the snow.

Conditions didn’t let up until the summit of Green Mountain — many hours later — as I took many creative off-trail lines to enjoy a little solitude. Snow continued to fall lightly all day. Once on Green — and with most of the afternoon having past — I finally moved onto more trafficked trails, then down back into town to catch a bus back home.
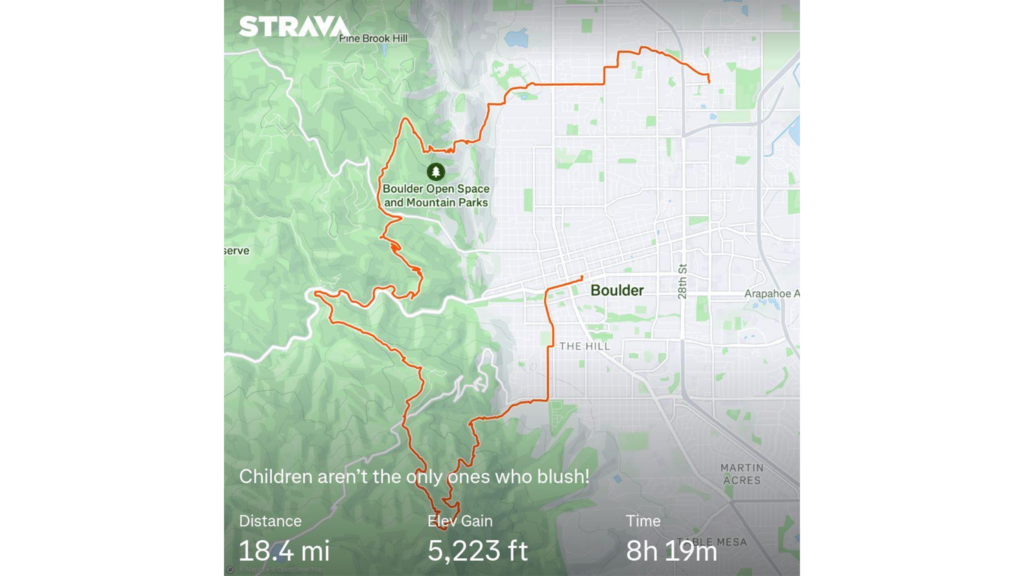
All told, I slogged a good 18+ miles in about 10 hours. A righteous day.
Data and Results
Here’s the data that was produced (and here’s the public Google Sheet):
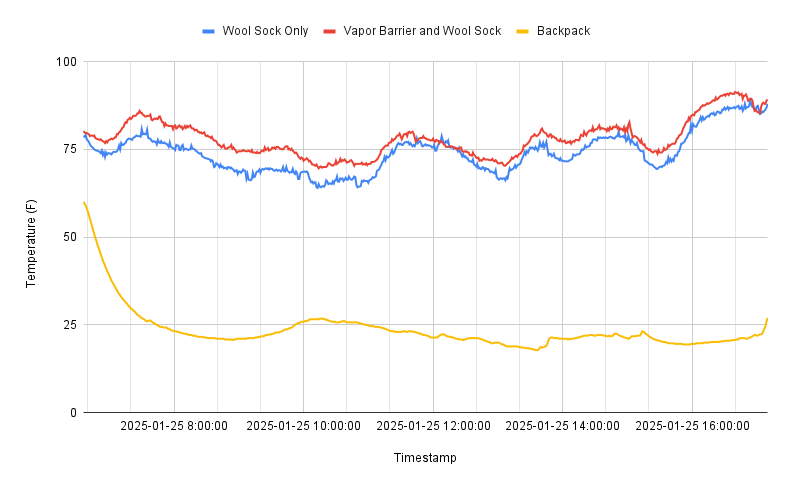
Yellow is the ambient temperature inside my pack. From my interpretation, it looks like it took a little while for it to come down from the starting temp, when my pack was in the house. The thermometer was inside a plastic bag so not to get wet and the backpack itself is made out of an impermeable plastic, so there may have been some heat captured. Average temp (after the cooldown) for the day from 8:00 am to 5:00pm was 21.9F, with a minimum of 17.8F and a max of 26.8F. Lower than freezing, but not arctic conditions by any stretch.
Blue was the foot without the vapor barrier/turkey bag and red was the foot with the vapor barrier. Viewing the graph, there is a marked difference in temperature, with the vapor barrier’d foot generally recording a higher high temp, a higher low temp and a higher average temp.
From the same 8am-5pm stretch of the graph:
| Foot | High | Low | Average |
|---|---|---|---|
| Vapor Barrier | 91.4 | 69.6 | 77.5 |
| No Vapor Barrier | 88.9 | 64.0 | 73.5 |
| Vapor vs. No-Vapor | +2.5 | +5.6 | +4 |
Most noteworthy, the vapor barrier foot experienced a higher average low temp than the non-vapor barrier foot by I think an appreciable amount: 5.6F.

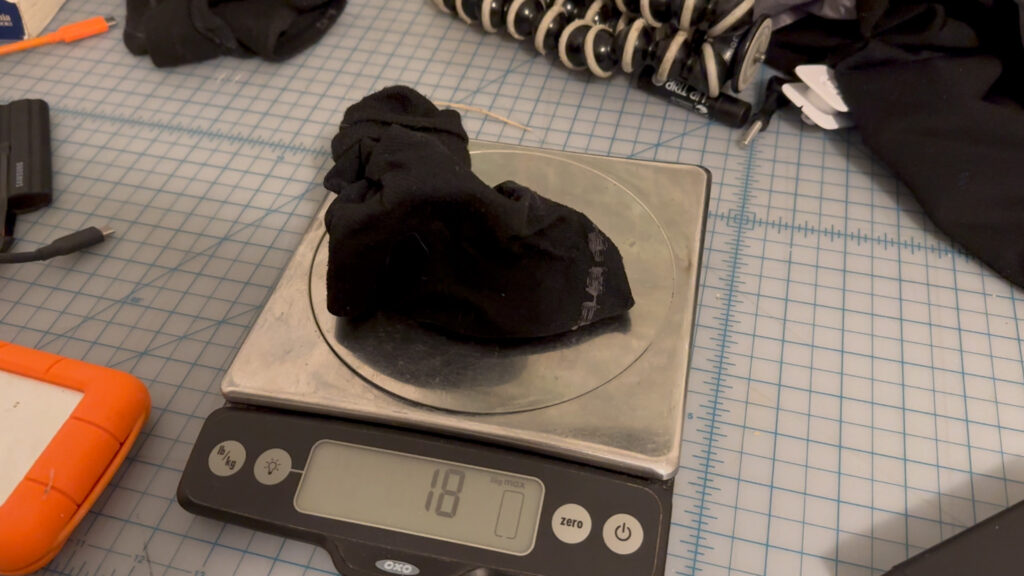
Weighing the liner socks after the hike did reveal that the vapor barrier foot had a heavier liner by 2 grams, which may not be very significant. The difference in weight could be attributed to perspiration that was trapped by the vapor barrier. This was far less than I was anticipating, as I was guessing that the vapor barrier would have turned my sock liner into a soggy mess given the ambient temperature outside after a fairly long, fairly grueling hike. Perhaps I simply nailed my layering perfectly for the conditions given my past experiences in similar conditions.
Conclusions
Could I feel a difference between my feet? Maybe, but not conclusively — the average of 4 degrees F isn’t massive, and the low temperature recorded for the non-vapor barrier foot is still reasonably comfortable.
This type of survey would be interesting to do again in more extreme conditions. But, it would be hard to ignore that the data from this simple n of 1 survey shows a marked increase in the temperature inside the boot when a vapor barrier was used.
Call to Action and Warning
What do you think? Obviously, the sample rate is small (me! once!), but I think it points to confirming the simple physics of the vapor barrier and the underlying principle of preventing evaporative heat lose as sound. Since excessive sweating did not occur, the downsides of a vapor barrier weren’t seen, but I want to caution anyone who does a similar trial to be aware of the potential of that outcome, before taking this system into more serious locales than what I experience on my own backyard trails.
Commercial Vapor Barrier Systems
Few companies offer vapor barrier products, as their practicality is extremely niche and using them outside their sweet spot is counter-productive. Demand is certainly there for the few products offered, so items are oftentimes sold out.
Rab Vapor Barrier Socks
Rab does make a commercial vapor barrier sock. They’re big advantage over a DIY solution is that they are reusable.
Rab Hooded Sleeping Bag Vapor Barrier Liner
Rab also makes a vapor barrier for your sleeping bag. This would be very useful in multi-day trips, where it’s very likely the efficacy of your down sleeping bag will be affected by the accumulation of moisture. Sleeping bags are difficult to dry in winter conditions.
Other Vapor Barrier Systems
I tend not to suggest products that I haven’t had any personal exposure myself to. Rab is a company I’m more familiar than most and I’ve handled these products above — at least in-hand. I’m mostly familiar with using vapor barriers for my feet and my hands. Since I’ve not used any other vapor barrier applications, I don’t feel I have the expertise to suggest other products.
Products Used in This Survey
If you yourself would like to experiment with vapor barriers and/or recreate my own testing, here are the products I used:
Oven Turkey Bags – these are big enough for most feet, although the dimensions are a little off, so anticipate dredging up some Origami skills. Taping the bag up high works for me to keep it all in place, as does putting a warm sock over it.
La Sportiva Trango Tech GTX – these are a Spring/Summer snow boot, but I’ve been able to stretch their use into the Winter. I usually champion lightweight gear and this boot weighs less than many of Sportiva’s more Wintry offerings. A vapor barrier helps with getting away with that. It is also a far more walkable boot them many other mountaineering boots, having a somewhat flexible sole. This does impact crampon use, so don’t go ice climbing in these if there are better options (easy snow climbing is fine). They’re also end of life, with a new model most likely coming soon (I have no idea of actual timeline). There is a new model called the, La Sportiva Trango Pro GTX, which may hint on things to come, once La Sportiva fleshes out the entire line of updated Trangos — the “Pro” version looks to me to be more of the most expensive, lightest weight, most performant version of the boot.
Thermometers
As I did when I did some testing of insulated bottles, I used two different thermometers from Govee. Both these thermometers connect via Bluetooth to my iPhone, log data by the minute, and allow you to export the data out:
I kept a Govee Hygrometer Thermometer in my pack to try to record outside temperture.
And in each foot, I had a Govee Smart Thermometer R1 which has a flexible (and long enough!) probe which I could tape to my foot to record the temperature inside my boot.

I’ve used plastic bag VBLs in Nordic style backcountry ski boots from -20C to +5C, and I haven’t noticed any excessive sweating caused by them. Only downside I see that after a week the liners (and feet!) smell pretty horrible!
Haha! I guess that’s to be expected. Sweating seems to be a personal thing. I would thought my feet would have sweated terribly (since my back sweats pretty well!) but I haven’t run into any problems myself.
I first learned about vbl for sleeping bags in early 80s, from a guy who did a multi-month solo trip south-north Quebec. Without a VBL, he had to spend several days in hunting cabins every few weeks to dry out his sleeping bag,which gained 10-20 lbs of moisture. He was tent camping between cabin, which were also food caches.
After that, he used vbls on long trips